Assembling a greenhouse is a rewarding yet complex process requiring careful planning and attention to detail. Start by understanding the basics of greenhouse construction‚ including site preparation‚ frame assembly‚ and glazing. Always follow manufacturer instructions to ensure safety and structural integrity. This guide provides step-by-step tips and essential information for a successful DIY project‚ suitable for both experienced builders and novices. Proper tools and clear instructions are key to achieving a durable and functional greenhouse. Begin your journey to growing plants year-round with confidence!
Overview of Greenhouse Assembly Process
The greenhouse assembly process involves several key stages‚ including site preparation‚ frame construction‚ glazing installation‚ and ventilation setup. Begin by selecting a suitable location and preparing the base. Next‚ assemble the frame using pre-drilled holes and bolts‚ ensuring alignment and stability. Install polycarbonate or glass panels securely‚ followed by fitting doors and vents for proper airflow. Each step requires precision and patience to ensure a sturdy and functional greenhouse. Always refer to manufacturer instructions for specific guidance and tips to avoid common assembly mistakes. Assembling the frame on a calm day is recommended for easier handling. Tools like screwdrivers‚ wrenches‚ and ladders are essential for the task. Proper assembly ensures a durable and weather-tight structure for your plants to thrive. Detailed manuals are provided with most kits‚ offering clear‚ step-by-step guidance for a successful project. Starting with a well-prepared base and following instructions carefully will lead to a seamless assembly experience.
Importance of Following Instructions
Following the assembly instructions meticulously is crucial for a safe and successful greenhouse setup. Properly executed steps ensure structural integrity‚ preventing collapses or damage. Ignoring guidelines can lead to misalignment‚ gaps‚ or weakened frames‚ compromising the greenhouse’s durability. Safety is paramount‚ as improper assembly may result in hazards during use. Adhering to instructions also helps avoid costly rework and ensures all components function optimally‚ such as ventilation and glazing. This attention to detail guarantees a secure‚ weather-tight structure tailored for plant growth and longevity. Always prioritize precision to achieve professional-grade results and maintain warranty validity.
Site Preparation and Safety Guidelines
Ensure a well-prepared site with a stable‚ level surface‚ free from debris and obstructions. Proper drainage and access are essential for safe assembly and maintenance. Always wear protective gear‚ including gloves and sturdy footwear‚ when handling materials. Avoid assembling in windy or wet conditions to prevent accidents and ensure a secure structure. Clear the area of hazards to create a safe workspace for all involved.
Choosing the Right Location for Your Greenhouse
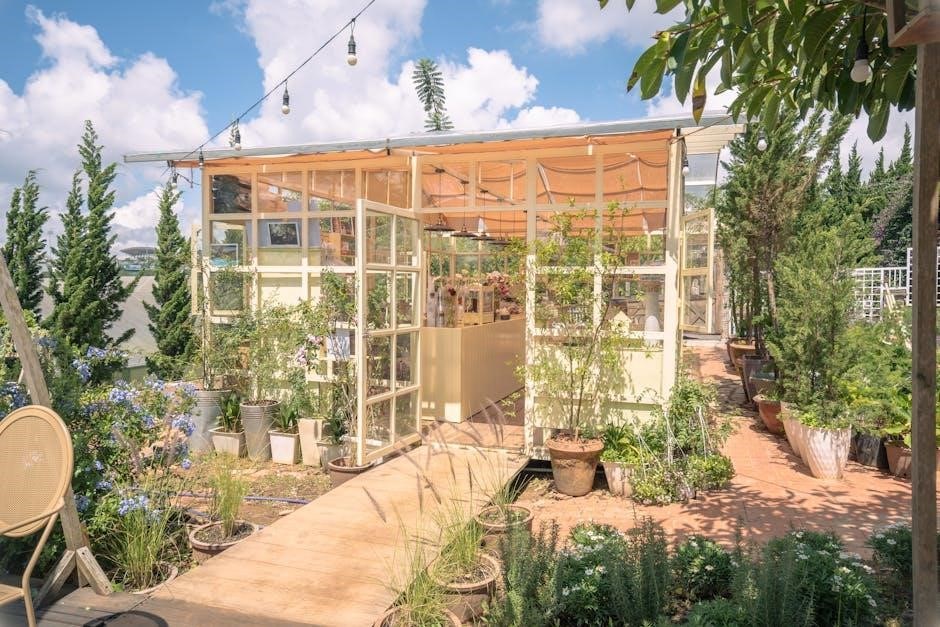
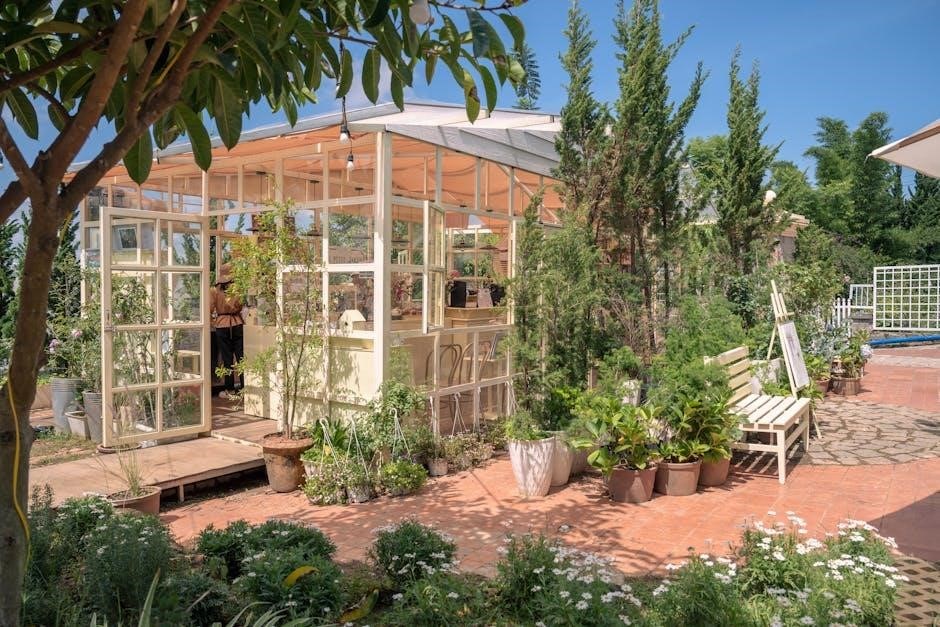
Selecting the right location is crucial for optimal greenhouse performance. Ensure the site receives maximum sunlight‚ ideally 6-8 hours daily‚ avoiding shaded areas. Avoid spots with overhanging trees to reduce leaf debris and potential damage. Choose a level surface to ensure even drainage and prevent water pooling‚ which can lead to structural issues. Protect the greenhouse from strong winds by placing it in a sheltered area. Ensure easy access for maintenance and watering. A well-chosen location will enhance plant growth and extend the lifespan of your greenhouse.
Safety Warnings and Precautions
Always wear protective gloves and sturdy footwear during assembly to prevent injuries from sharp edges or heavy materials. Ensure the area is clear of debris and tripping hazards. Avoid assembling in windy or wet conditions‚ as this can compromise stability and safety. Read the instructions thoroughly before starting‚ and follow all manufacturer guidelines. Handle polycarbonate or glass panels with care to prevent breakage. Keep children and pets away from the assembly area. Proper ventilation is essential to avoid overheating during use. Follow these precautions to ensure a safe and successful assembly process.
Preparing the Base and Foundation
A sturdy base and foundation are crucial for a stable and durable greenhouse. Begin by clearing the site of debris and leveling the ground to ensure even placement. Lay a foundation of gravel‚ concrete‚ or wooden battens‚ depending on the greenhouse type and manufacturer instructions. Ensure the base is level and secure to prevent shifting. For larger greenhouses‚ consider a concrete slab for added stability. Properly anchoring the frame to the foundation will ensure safety and longevity. Always follow the manufacturer’s guidelines for base preparation to guarantee a solid structure.

Frame Assembly Instructions
Start by unpacking and organizing all frame components. Construct the base frame first‚ ensuring all corners are square and securely fastened. Attach side walls and roof sections step-by-step‚ following manufacturer guidelines for proper alignment and stability. Use provided hardware and tools to tighten all bolts and screws evenly. Double-check all connections for strength and accuracy before moving on to glazing or other components. Proper frame assembly is essential for structural integrity and durability.
Unpacking and Organizing Parts
Begin by carefully unpacking all components from the boxes and laying them out in a clean‚ dry workspace. Organize parts into categories‚ such as frame sections‚ screws‚ bolts‚ and glazing materials. Use the provided inventory list to verify that all items are present and undamaged. Label each part for easy identification during assembly. Protect polycarbonate or glass panels from direct sunlight and moisture to prevent damage. Having all tools and materials ready ensures a smooth and efficient assembly process.
Constructing the Base Frame
Begin by laying out the base frame components on a flat surface. Use a wrench or screwdriver to connect the corners‚ ensuring all edges are flush and secure. Check that the frame is square by measuring diagonals; they should be equal. Clamp the sides together while tightening bolts to maintain alignment. Once the base is assembled‚ place it on the prepared foundation and anchor it with ground screws or concrete anchors. For larger greenhouses‚ consider working in pairs to simplify the process. Ensure the frame is level and sturdy before proceeding to the next steps.
Attaching the Side Walls and Roof
Attach the side walls to the base frame using the provided bolts‚ ensuring they are securely tightened. Align the roof panels with the frame‚ starting from the front and moving backward. Use the included connectors to lock the panels in place. For larger greenhouses‚ a second person can help maintain stability while attaching the roof. Ensure all edges are flush and properly aligned to avoid gaps. Once the roof is secure‚ double-check all connections for tightness. Polycarbonate panels should be carefully fitted to prevent damage. Finally‚ anchor the base to the ground for added stability.
Glazing and Covering the Greenhouse
Install polycarbonate or glass panels securely‚ ensuring a snug fit to prevent gaps. Use provided clips or frames to hold the glazing material in place tightly‚ ensuring durability and weather resistance.
Materials and Tools Needed for Glazing
For glazing‚ you’ll need polycarbonate or glass panels‚ rubber seals‚ and glazing clips. Essential tools include a screwdriver‚ drill‚ rubber mallet‚ and measuring tape. Safety gear like gloves and goggles is crucial. Ensure all materials are compatible with your greenhouse frame to avoid leaks or damage. Proper preparation and organization of these items will streamline the glazing process and ensure a secure‚ weather-tight finish. Refer to your specific kit’s instructions for any additional requirements.
Installing Polycarbonate or Glass Panels
Begin by carefully unrolling and cutting polycarbonate panels to size‚ ensuring they fit snugly within the frame. For glass panels‚ handle with care to avoid breakage. Align each panel with the frame’s glazing channels‚ securing them with clips or screws. Tighten firmly but avoid over-tightening‚ which could damage the material. Use a rubber mallet to tap panels into place gently. Ensure all edges are sealed with rubber gaskets to prevent leaks. Double-check alignment and tightness for a secure‚ weatherproof finish. Always wear gloves when handling sharp edges.
Securing the Glazing Material
Once the panels are in place‚ secure them using the provided screws or clips. Tighten firmly but avoid over-tightening‚ which could damage the material. For polycarbonate‚ ensure the edges are snug within the frame’s channels. Glass panels should be sealed with rubber gaskets to prevent leaks. Use a second person to help tighten larger panels evenly. Double-check all fasteners and seals for gaps. Wearing gloves is essential when handling sharp edges. Proper securing ensures durability and protects against weather conditions.

Ventilation and Door Installation
Proper ventilation is crucial for temperature control and humidity management. Install vents and automatic openers to ensure airflow. Mount the door securely‚ aligning it perfectly for smooth operation and airtight closure when needed. This ensures optimal conditions for plant growth and maintains structural integrity. Follow manufacturer guidelines for precise installation to avoid issues during use. Properly functioning doors and vents are essential for a healthy greenhouse environment. Ensure all components are tightly sealed and functional before finalizing assembly.
Types of Ventilation Systems
Greenhouse ventilation systems are essential for maintaining optimal temperature and humidity levels. Common types include manual and automatic roof vents‚ side louvers‚ and cooling systems. Manual vents require physical adjustment‚ while automatic ones open and close based on temperature. Side louvers provide additional airflow and are often used in combination with roof vents. Cooling systems‚ such as misting or evaporative cooling‚ enhance ventilation efficiency. Each system offers unique benefits‚ ensuring proper air circulation and heat management for a healthy growing environment. Choose the best option for your greenhouse size and climate needs.
Installing Vents and Automatic Openers
Installing vents and automatic openers is crucial for maintaining proper airflow and temperature regulation in your greenhouse. Begin by aligning the vents with the pre-drilled holes in the frame and securing them with screws. For automatic openers‚ attach the mechanism to the vent and ensure it is properly calibrated to open and close based on temperature changes. Connect the opener to its power source and test functionality. Ensure all vents are sealed tightly when closed to maintain heat. Proper installation guarantees efficient ventilation and climate control.
Mounting the Door and Ensuring Proper Alignment
Mounting the door requires precision to ensure smooth operation and proper alignment. Attach the hinges to the door frame and align them with the pre-drilled holes on the greenhouse frame. Secure the hinges using the provided screws and tighten firmly. Install the latch or handle‚ ensuring it engages smoothly with the door catch. Double-check the alignment by opening and closing the door multiple times. Make adjustments if necessary to achieve a snug fit and proper sealing. Proper door alignment ensures easy access and maintains the greenhouse’s structural integrity.
Final Assembly and Quality Check
After completing all components‚ tighten every bolt and screw to ensure stability. Inspect for gaps‚ misalignments‚ or loose parts. Test door and ventilation functionality to ensure proper operation.
Tightening All Bolts and Screws
Once the frame‚ glazing‚ and components are in place‚ double-check all connections. Use a wrench or socket set to tighten bolts and screws securely. Ensure all parts are evenly tightened to avoid warping or misalignment. Refer to the manufacturer’s torque specifications for optimal tightness. Reinspect all joints and fasteners‚ paying extra attention to roof and door hinges. Proper tightening ensures stability and prevents leaks or structural issues. Avoid over-tightening‚ especially with polycarbonate panels‚ to maintain integrity.
Inspecting for Gaps or Misalignments
After completing the assembly‚ thoroughly inspect the greenhouse for any gaps or misalignments. Check all seams‚ panel edges‚ and frame connections. Use a flashlight to spot hidden gaps‚ especially in the roof and sidewalls. Ensure doors and vents align properly and close securely. Address any issues by adjusting bolts or resealing gaps. Misalignments can lead to leaks or structural instability‚ so precision is key. Double-check every joint to ensure a watertight and sturdy greenhouse.
Testing Door and Ventilation Functionality
Once assembled‚ test the door and ventilation systems thoroughly. Open and close the door to ensure smooth operation and proper alignment. Check that vents open fully and automatically if equipped. Verify that all seals are tight to prevent air leaks. Test functionality under various conditions to ensure optimal airflow and temperature regulation. Make any necessary adjustments to hinges or automatic openers. Properly functioning doors and vents are crucial for maintaining a healthy environment inside your greenhouse.